Uploading multiple events or campaigns using template file
This article is relevant for: All subscriptions
To upload multiple events (FD Live only), click on "Add Events" in Lookout and then select "Multiple Events".

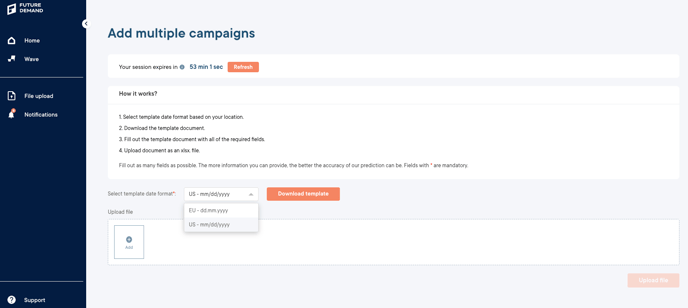
To upload multiple campaigns, click on "Add Campaigns" in Wave. You will find the button in the same place as in Lookout (see above). If you upload campaigns in Wave, they will also appear in Lookout (FD Live only), and conversely, events uploaded in Lookout will also appear in Wave. There is no difference if you upload multiple campaigns or events.
Each country uses different Excel formats when it comes to dates. Therefore we created for you a template for, Europe and the USA. Please select the template based on your location.

Please note that different templates require different date formats:
- the dates of the events in the US Template must be written in this format: mm/dd/yyyy
- the dates of the events in the EU Template must be written in this format: dd.mm.yyyy
Example given for 18 September 2024
- US template: 09/18/2024
- EU template: 18.09.2024
The template consists of four sheets: Instructions, Events or Campaign, Lineup Artists, and Setlist Works.
Please note:
- Some of the fields are obligatory (red stars) and cannot be skipped. The more information we can get from you the better will be the creation of the Taste Clusters and therefore it is more likely that your campaign is successful.
- Most of the fields are for events. If you are running a campaign which is not linked to events it is very important to provide a detailed description of the product or service you running a campaign for.
- Also unknown artists can be interesting for the campaign. Put in as much data as you can.
The Instructions tab will give you the right format of the information that you will encode. This gives a better scope of what is accepted in the app to avoid any errors in uploading.

IMPORTANT:
- Enter the correct data in the tab campaign or event before starting to fill in the information in the tabs "Lineup Artist" and "Setlist Works". If possible do not change anything afterwards in the tab campaign or event!
- If you change something in this tab the identifiers in the tabs "Lineup Artist" and "Setlist Works" for artists and program of this event have to be changed as well. If not the data where you changed something will not be uploaded!
- The identifier in those tabs is created based on the information of the event or campaign tab with the general information. The tool needs this identifier in order to match the right artists and program to the right event or campaign.
- Excel does not give a possibility to update the identifier automatically. Therefore take care.
There are multiple columns which can or have to be filled out in the tab campaign or event:
- Identifier: automatically generated so the app can easily detect which information belongs to which campaign or event
- Title: title of your event or campaign
- Description: here you can enter a description of the event or campaign. Fill in all important information for the event or campaign in full sentences.
- Category: click on the dropdown button to select which specific category the event or campaign belongs to, if not applicable, choose “Other”
- Date: date the event will be held or until when the campaign should run
- Time: time the event will be held or until when the campaign should run
- Avg. Price: if you have an event or campaign with multiple ticket or price categories sum them up and divide them by the amount which gives you the average
- City: the city where the event or campaign will take place
- Venue and Hall: where the event or campaign takes place
- Venue capacity: how many people fit in the hall for this specific event or campaign
In the Lineup Artists sheet, input the people involved in the event or campaign.
- Event identifier: Choose the right identifier for each person involved in the event or campaign (see screenshot)
- Artist Name: Name of the artist involved in the event or campaign
- Role/Type: Use the drop-down menu to select the role the person has in the event or campaign

In the Setlist Works sheet, input the composer or author of the pieces or works involved in the event or the campaign
- Identifier: Choose again the right identifier for each point connected to this specific campaign or event (like for Lineup Artist above)
- Author/Composer: Enter the name of the person who composed/texted the presented work (i.e., play, opera, music album, stage program, or similar)
- Work Title: Enter the corresponding title of the piece.
Then save your file, and go back the app. (Recommendation: Name your event file properly so you won’t be confused when uploading it to the app.)
- Click +Add as seen below or drag and drop your file to the field.

- Search your event file and click Upload file.
- If successful, your events will appear on the app within an hour and you will receive a message. However, if you encounter any errors uploading the file, it could mean the following:
- You entered some data with the wrong format that the system could not identify (e.g. wrong date format, wrong time format, etc.)
- You left one of the obligatory cells blank (i.e. title)
